
| Webspace
generously donated by synercom/edi |
Thank
your for visiting. If you enjoy this site please make a donation. |
|
 Aerial pic from Photos by Kat |
 Aerial pic from Photos by Kat |
 |
 Aerial pic from Photos by Kat |
 |
|
 |
These
pictures are of a huge quartz formation in one of the middle canyon's
walls; the two above were taken nearly straight up from the road.
Whitebluff, as it's known on highways dept. maps, is a good few
hundred feet thick and forms a slight overhang, protruding out along a
buttress wall that shields a hidden valley in behind. Supposedly
this is low-grade gold-quartz ore, but either not of sufficient quality
to bother mining or just too geotechnically difficult to reach.
That does appear to be a cave mouth in the middle of the picture
at left, and at the extreme right in the picture at right, and it may
well be as there are several caves in the canyon, including one large
one from which one of the canyon's many streams issues. If the
dark spot in the picture is a cave opening, it's a good 50' in
diameter - but 1800' up the canyon wall. |
 |
 |
 Aerial pic from Photos by Kat |
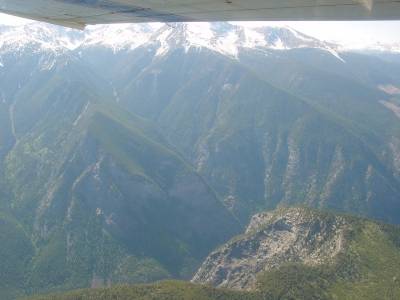
The diagonal stripe on the cliff-face in the centre of this picture is the same as that in the black-and-white pics of Whitebluff just above. The three ranges of the Applespring Creek area can be seen in the dim of the background; in between there and the edge of the canyon lies the broad, rolling slope of the Camoo basin. Despite its igneous geomorphology has certain characteristics of karst topography - caves, intermittent streams etc. - suggesting that it may have been something of a cave formed of rock and ice before the end of the ice age. The Bridge River Glacier, when it still existed this far down the valley, must have pushed under and through the crystalline structure of the ridge that today is (separately) the Shulaps Range and Mission Ridge, having nowhere to go as it flowed west and became jammed in between the Bendor Range/Mission Mountain and the Shulaps-Mission Ridge. The stresses and strains on the rock caused by this immense pressure show up in the many striations and lineations in the canyon's wide variety of rock surfaces and erosive behaviours. I don't know the exact geologic story of the canyon's creation, but I get the feeling that the glacier must have burrowed into and under the range somewhat, shattering its rocks as well as forming a huge rock-and-ice filled maw beneath which the river-melt carved a cave. |
 |
 |
| The lit walls in the background of these
photos are up to three miles off from the cameraand range from 3500' (on
the right) and up to 5000' (on the left); the peak summits above the
forest, however, are over 6000' and 6500' respectively; the canyon
bottom is below 2200'. The alpine ridge in the left background is the
summit of Mission Ridge, which
drops off precipitously from that height to Seton Lake 6000-odd feet below; around 1600 feet below
the camera's elevation. |
|
 |
 This is a black-and-white of the same cliffwall in the colour picture at above right. |
| The ribbon-folded rockwall
on the right is one of the canyon's many dramatic ramparts. The road
passes immediately beneath the canyon's rockwalls, which are limned
with thick pine forests and alpine meadows. The canyon constantly
howls with wind connecting the different climates of the upper and
lower valleys and the adjoining high alpine; anyone cycling it might
do best to plan their trip downstream as upstream, from Moha to the
Dam, the headwind is near-constant and there's a gentle but noticeable
uphill nearly the whole way. Hiking is possible on trails higher
up the canyon walls and near the rim but also dangerous because of
rockfalls and precipices and a medium to high wildlife risk; much of
the canyon is fairly "rotten rock" as climbers call it. The
abandoned logging roads partyway along the canyon run up into Hell Creek, although the easier way to get to
the old gold mine is around a road off the Yalakom River up Blue Creek
and in over the shoulder of the mountain instead of up from the
canyon-bottom. |
|
 |
 |
 Aerial pic from Photos by Kat |
 Aerial pic from Photos by Kat |
|
 |
 |
 |
 |
 Aerial pic from Photos by Kat |
 Aerial pic from Photos by Kat |
| These
pictures are of a spot on the canyon road known as "the overhang"
and were taken shortly after the road's initial construction in
1958, when the damming and diversion of the river dried up the once
raging riverbed at last allowed the construction of a road linking the
upper and lower Bridge River Valleys.
Until the road was built, the easiest way into the upper Bridge
country was via the steep pass of Mission
Mountain, accessed from Shalalth onSeton Lake. The alternative was a strenuous and
hazardous all-day horsepack from the canyon's mouth at Moha to the
entry to the gorge at the foot of Mission Pass - a very long,
dangerous 10 miles of steep and narrow trail. I remember driving
along the new road as a young child during a heavy mountain storm
when there was still some flow in the riverbed, watching massive
boulders rolling past us at eye-level, moved by the force of the
road-high river. The overhang today has been blasted off for the most
part but still looms over the road as a reminder of the days when the
canyon was barred to easy passage through to the rich upper valley
beyond. The picture on the left is westbound, that on the right
eastbound, although so torturous is the canyon that the carmera on the
left if facing NE, and on the right SW. Widening of the road after this
initial "punch" led to a genuine flat-roofed cavern overhang at this
spot that was not blasted off until redevelopment of the road for
logging traffic in 1976; a picture of this will be posted when I find
one. One thing about this spot that is difficult for a lens to
illustrate is that the overhang is the lower buttress of a 2500'
rockwall shoulder of the peak immediately above, and the scree across
what's left of the river (note the old highwater line on the left) is
the base of a 3500 ft flange of the rock curtain (on the right in the
first pair pictures) that towers over the overhang at close quarters. |
|
 |
 |
 This
is a view of the coffer tunnel at Terzaghi Dam,
commonly known as Mission Dam, through which the Bridge River was diverted while the dam
was under construction; the concrete structure in the upper part of
the picture is the rarely-used spillway. For a sense of scale, the
tunnel is about 5 metres (17 ft.) in diameter. Note the shatter-pattern
in the rocks above the tunnel and adjacent to the spillway, indicative
of the blasting that was used to secure the foundations of the dam in
its canyon setting. The mountain wall this tunnel is at the foot of
is a few thousand feet high, as is that immediately behind the
lens.
This
is a view of the coffer tunnel at Terzaghi Dam,
commonly known as Mission Dam, through which the Bridge River was diverted while the dam
was under construction; the concrete structure in the upper part of
the picture is the rarely-used spillway. For a sense of scale, the
tunnel is about 5 metres (17 ft.) in diameter. Note the shatter-pattern
in the rocks above the tunnel and adjacent to the spillway, indicative
of the blasting that was used to secure the foundations of the dam in
its canyon setting. The mountain wall this tunnel is at the foot of
is a few thousand feet high, as is that immediately behind the
lens.
